I’m going to show you how I paint dungeon terrain, bringing it to life with an awesome, old-school feel. This painting technique is perfect for giving it that classic, grimy, ancient vibe. Whether you’re working on dungeon tiles, 3D printed dungeon walls, or just about any piece of tabletop terrain that needs to look like it’s been around for ages, this method will do the trick.
In the video below, I’m painting 3D printed modular walls from Saucermen Studios’ Dungeon Assault: Modular Walls – Base Set. Let’s grab some paint and get started!
Watch the Video | Buy TTRPG Books and Accessories | More Game Content
Step 1: Start with Black Primer
Once I’ve got my 3D printed dungeon walls ready, the first thing to do is prime them black. Using an all-in-one paint and primer product (like Rustoleum Painter’s Touch) works great to get a nice, solid black base coat. Make sure you use Flat Black.
Quick Tip: When you paint dungeon terrain, you don’t need to paint the parts that won’t be seen – like the very bottom of of these pieces, or even the sides where they connect – unless you really want to!
Step 2: Overbrush with Dark Gray
Next up, I overbrush with a dark gray craft paint. You can find this easily at any local craft store.
If you’re not familiar with it, overbrushing is kind of like dry brushing, but you leave a bit more paint on your brush. You’re trying to get a decent amount of coverage here, but it’s totally fine if some of that original black shows through. This helps lay down your main color while keeping those nice shadows from the black primer.
Step 3: Paint Dungeon Terrain with a Heavy Dry Brush
Now, let’s grab a regular gray – basically, just a lighter shade of gray. If you don’t want to buy another paint bottle, mixing a little white into your dark gray will work perfectly! For this step, we’re definitely dry brushing.
You’ll still want a fairly heavy dry brush here. The goal is to build up the texture on the stone, hitting the raised areas and getting good coverage without filling in all the deeper cracks. This really makes that stone texture pop!
Step 4: The “Unexpected” Vanilla Highlight
Alright, this might sound a little odd, but trust the process: When I paint dungeon terrain, one of the key colors I use is vanilla. It’s pretty much an off-white. You might think it looks way too light, but this is where the magic happens!
With a light dry brush, focus on all the edges, corners, and highest points – basically, anywhere light would naturally hit the most. This step really helps bring out the fine details in your dungeon terrain and creates a great sense of light and dimension. It’ll look quite bright right now, but don’t worry, we’ll tone it down later!
Step 5: Paint Dungeon Terrain Silver for Metal
These particular 3D printed dungeon walls use connecting pieces. I like to paint these silver because they usually look more like metal than stone. A heavy dry brush of silver works nicely, letting some of the black base show through for a worn, used metal appearance. It gives them just enough shine to stand out from the stone walls.
Step 6: Burnt Umber for Wooden Details
These dungeon walls have cool wooden accents like ladders and planks. I use burnt umber (which is a dark brown). You’ll want to be a bit more precise with your brush here, making sure to get all the sides, rails, and top edges of the wooden parts. This isn’t a dry brush step, so take your time.
Step 7: Black for Metal Features
Next, we’ll use black for any other metal details like bars or decorative finials. Painting these black gives them a cool, heavy cast-iron look, and it sets them up perfectly for adding some grungy rust later. Just be careful around the edges of the stone sections.
You might wonder why repaint these black if they were already primed black. The simple reason is that, when you paint dungeon terrain, it’s hard to be precise with dry brushing. This makes it much easier because you don’t have to worry about avoiding these specific areas. Go ahead and get some of your dry brush colors onto these areas – then paint black over them with a little more care later.
A little black dry brush on any silver-painted cage doors can also help create a cohesive metal look throughout your pieces.
Step 8: Adding Rust
Here’s a fun trick! Rust-colored paint pens are fantastic for adding a light touch of rust to your metallic pieces. Just give them a good shake and make sure the paint is flowing. You don’t need to be super precise; a light hand can create a really realistic, weathered metal effect. Leaving some areas uncovered can actually make it look even more authentic!
Step 9: Warmth for Wood with Dark Yellow
For the wooden sections, I use a very warm dark yellow. Lightly dry brush this onto the wood to add a touch of warmth. While we want an overall old and grimy feel, this subtle pop of color helps the wood stand out nicely from the stone. Remember to hit those edges and corners to really bring out the wood grain details!
Step 10: Beige for Wood Wear and Tear
To add even more character to the wood, use beige for a very light dry brush. Focus on edges and highlights. This adds a nice subtle color variation and gives the wood a great “wear and tear” appearance.
Step 11: Paint Dungeon Terrain with Bronze for Aged Accents
This is a really satisfying step! I used bronze paint to dry brush metal caps on top of these walls and connector pieces. This creates a beautiful aged bronze look and helps keep a consistent color theme across this 3D printed terrain. It’s also fantastic for adding detail to designs like a compass or emblem on a wall.
I used miniature paint here, which I normally wouldn’t for terrain. Miniature paint is much more expensive than craft paint because it’s much higher quality. Terrain doesn’t need the concentration and small pigment particles that minis require. However, this was a really small project, and I didn’t want to have to run to the store for more paint. So I used what I had.
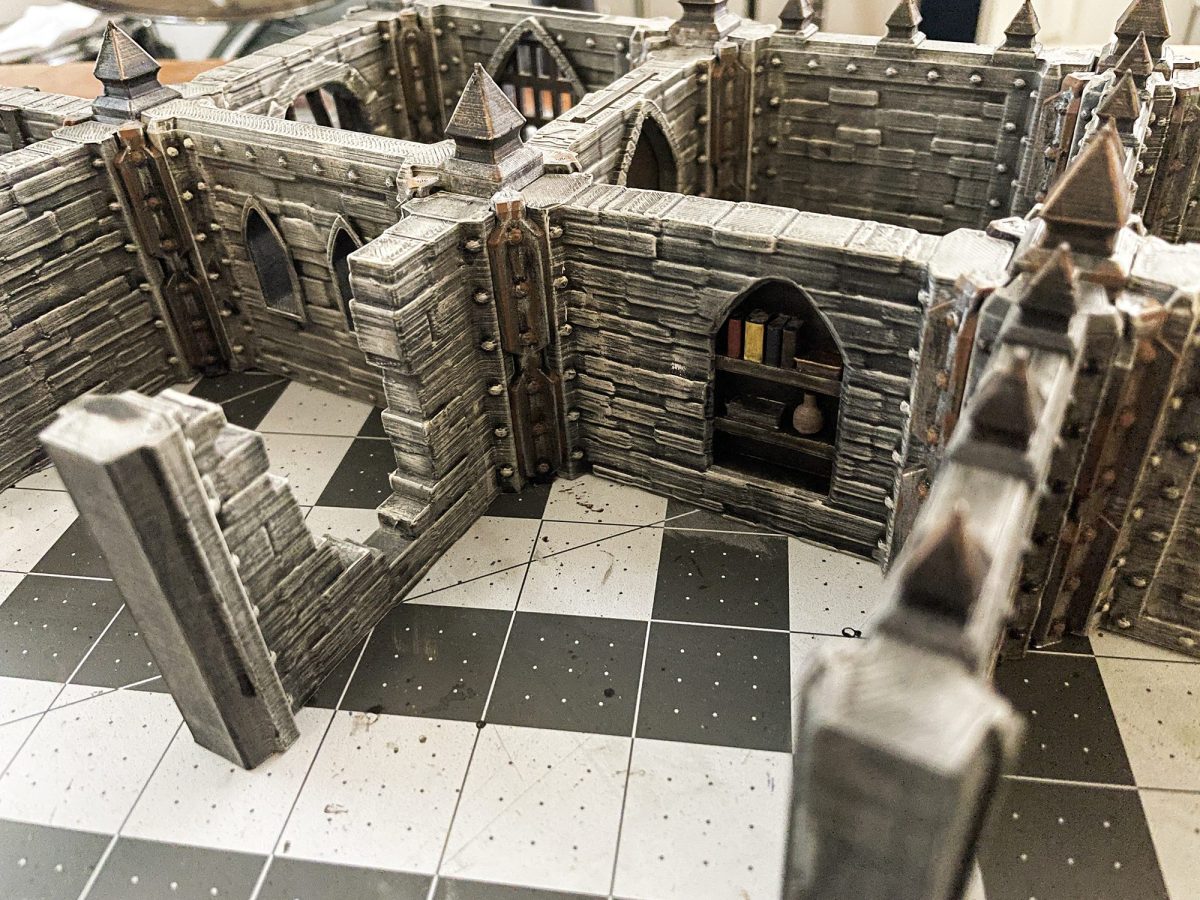
Step 12: Detailing Bookshelves and Small Elements
These 3D printed dungeon walls include some really cool detailed bookshelves. Burnt umber works well for the shelves themselves, letting the black primer create natural shadows in the deeper parts. Then, it’s time to have some fun with the books! Use various colors like true red, dark yellow, dark blue, and chocolate, and then a beige for the “pages.” Small details like vases (beige for pottery) and treasure boxes (silver or bronze) add so much personality.
Step 13: The Magic of the Black Wash When You Paint Dungeon Terrain
This is the final, magical step when you paint dungeon terrain – the black wash! Coat every single piece with it. This wash helps to unify all the different colors, deepens shadows, tones down any spots that look too bright, and, most importantly, gives everything that incredible, grimy, ancient dungeon feel. It really helps bring out the shadows and ties the whole piece together.
Just make sure it doesn’t pool too much in any one spot – you can always thin it out with your brush if needed.
Step 14: Seal Dungeon Terrain with Matte Finish
Once everything is completely dry, finish up with one or two coats of Krylon Matte Finish. This protects all your hard work and gives your 3D printed dungeon walls a nice, non-glossy, realistic look.
And there you have it! Beautiful, grimy, ancient 3D printed dungeon walls ready to set the perfect scene for your next tabletop adventure. What kind of dungeon are you excited to create with your newly painted terrain?
If you purchase any products linked on our website, we may receive an affiliate commission.